CPTR 124 Fundamentals of Programming
In this lab you will reorganize your geometry functions into a separate file, add an extra function, and ensure that your code works properly within a graphical application.
- Teams
You are encouraged to work with a partner for this lab. You and your partner should begin thinking about the problems and begin writing the code before lab time.
- Ensure that you have the necessary graphics files
Windows.
If you are working on your own Windows computer, you need to acquire four files:
You can right click on the link to download the file. Once downloaded, copy the files to the following locations:
- glut32.dll: put this in your c:\Program Files (x86)\Microsoft Visual Studio 12.0\VC\bin\ folder. (You will need to adjust the path if you installed Visual Studio elsewhere. If you have a 32-bit version of Windows, use the c:\Program Files\Microsoft Visual Studio 12.0\VC\bin\ path instead.)
- glut32.lib: put this in your c:\Program Files (x86)\Microsoft Visual Studio 12.0\VC\lib\ folder. (Again, You may need to adjust the path.)
- glut.h: create a folder named GL in your c:\Program Files (x86)\Microsoft Visual Studio 12.0\VC\include\ folder. Copy glut.h and sgl.hpp into this new folder.
Linux. If you are running Linux, inquire in lab for detailed installation instructions.
Mac OS X. If you are running OS X, add the sgl.hpp file to your project, and change the #include directive in visualgeometry.cpp to read
#include "sgl.hpp"
If you are working on a lab machine, the necessary graphics files should be present.
- Create a new project
For your convenience, VisualGeometry2013.zip contains a skeletal Visual Studio 2013 project that you may begin using right away. (If you are using Visual Studio 2012 instead of Visual Studio 2013, you should get the VisualGeometry2012.zip zip file. If you are using XCode on a Mac, you will need to get the three files below and add them to your project.) The VisualGeometry project contains three source files:
- geometry.h
This file contains the prototypes for the functions in the geometry.cpp file. The functions include:
- print_point (prints to a string instead the console; code is provided)
- distance (same as before)
- slope (same as before)
- intercept (same as before)
- line_equation (prints to a string instead the console; it is overloaded)
- intersection (new function, see below)
You should not modify the contents of geometry.h.
- geometry.cpp
Your attention will be devoted exclusively to implementing the code within this file. This file contains skeleton code, meaning that you will add code to the existing framework. For the most part you can copy parts of your code from the previous assignment into the functions in geometry.cpp. Note that two of the functions deal with printing to strings instead of the console.
-
visualgeometry.cpp
This file contains the main function and all the necessary code to manage the graphics display. You should not modify the contents of visualgeometry.cpp.
- geometry.h
- Printing to a string instead of cout
The graphics code in visualgeometry.cpp requires a string object to render the line equations and point coordinates. The function print_point shows how to print to a string object instead of cout. You must provide the missing code in line_equation to do the same. The skeleton code is in place; you need only "print" to the oss object instead of the usual cout object.
- Implement a new function
You need to implement a new function, intersection, that expects four double value parameters and two double reference parameters. Its prototype is
     void intersection(double m1, double b1, double m2, double b2,
                    double& x, double& y);
The function assigns to x and y the coordinates of the point of intersection of line #1 (slope = m1, intercept = b1) and line #2 (slope = m2, intercept = b2). Ordinarily the intercept component is the y-intercept, but note that if the slope of a line is HUGE_VAL, the line is vertical and so its intercept represents an x-intercept rather than an y-intercept.
If the lines do not have a single point of intersection, the function should assign HUGE_VAL (declared in <cmath>) to both x and y. The client code can then check for a valid intersection point.
How do you compute the point of intersection of two lines?
- If the two lines have the same slope, there is no single point of intersection. The function assigns the bogus point (HUGE_VAL, HUGE_VAL) in that case.
- If neither
line is vertical,
we have a pair of equations that look like
y = m1x + b1 Since both righthand expressions equal y, set them equal to each other:
y = m2x + b2m1x + b1 = m2x + b2 and solve for x:m1x - m2x + b1
=
m2x - m2x + b2
m1x - m2x + b1
=
b2
m1x - m2x + b1 - b1
=
b2 - b1
m1x - m2x
=
b2 - b1
(m1 - m2)x
=
b2 - b1
x
=
(b2 - b1)/ (m1 - m2)
This final equation
x = (b2 - b1)/ (m1 - m2) serves as a formula to compute x. Once you have x you can plug it into either of the original equations to compute y. This (x,y) point is the point of intersection of the two lines.
- If one of the lines is vertical, you cannot use the above formula. Attempting to perform arithmetic with HUGE_VAL will not produce a valid result. Since you know the x-intercept of the vertical line, you can deduce the x coordinate of the intersection directly from the vertical line. You then can plug this x value into the equation for the non-vertical line to compute the intersection point's y coordinate.
- Additional remarks
You may have to fix errors in your existing functions if the new graphical client code reveals logic errors that were not uncovered by earlier tests.
The most common problem is an incorrect and/or incomplete intersection function. The code within visualgeometry.cpp depends on a correctly written intersection function to draw a line from one side of the window to the other. Since it is easy to experiment with all kinds of lines visually, your testing may reveal errors in your existing code. If you do not see any lines or lines are missing in certain situations, focus on correcting your intersection function. Pay particular attention to how you handle vertical lines.
- Program execution
The graphical application allows the user to interactively supply points for lines that potentially intersect.
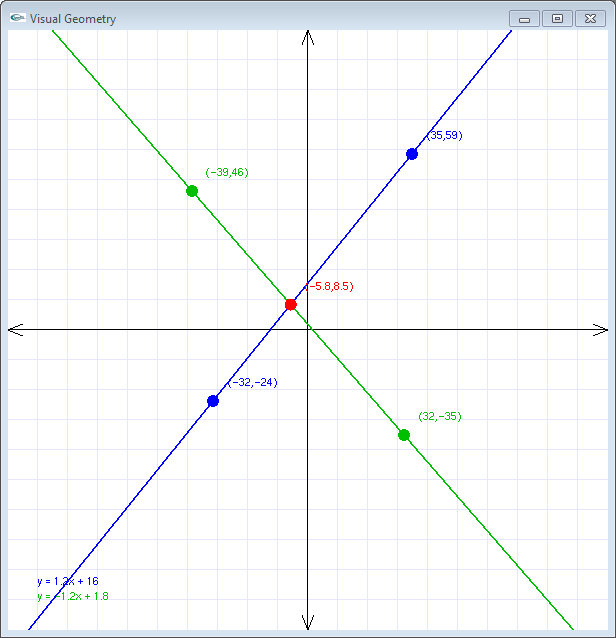
The axes range from -100 to +100, so each square on the graph paper is 10 units wide by 10 units high. The location of the points, the equations of the lines, and the intersection point are printed in the console window. You do not need to program this functionality; it is built into visualgeometry.cpp. Remember, the only file you are supposed to touch is geometry.cpp; do not modify geometry.h or visualgeometry.cpp.
Some useful interface shortcuts include:
- If you wish wish to make a vertical line immediately,
hold down the [Alt] key when placing the first point
of the line. The graphical interface will automatically
position the line's second point on the x-axis to
create a vertical line.
- If you wish wish to make a horizontal line immediately,
hold down the [Ctrl] key when placing the first point
of the line. The graphical interface will automatically
position the line's second point on the y-axis to
create a vertical line.
- If you wish wish to clear all the points from the graph and make two new lines, press the [Esc] key.
- If you wish wish to make a vertical line immediately,
hold down the [Alt] key when placing the first point
of the line. The graphical interface will automatically
position the line's second point on the x-axis to
create a vertical line.
- Check out
Your finished program will be evaluated for correctness and compliance. When approved, you should submit your C++ source file to eclass.e.southern.edu. Be sure your name and your partner's name are included in comments at the top of each source file.